How To Compress Files Using 7Zip And WinRAR: A Comprehensive Guide
In today's digital age, managing large files and folders efficiently has become a necessity. Whether you want to free up storage space, send files through email, or simply keep your data organized, compression tools like 7Zip and WinRAR can be incredibly useful. In this comprehensive guide, we will explore how to compress files using both 7Zip and WinRAR, two popular utilities that offer unique features and functionalities.
Understanding 7Zip
What is 7Zip?
7Zip is a versatile, free, and open-source utility designed for archiving and compressing files. Similar to WinRAR in many ways, the key distinction is that 7Zip is entirely free for lifetime use, making it an attractive choice for users who don't want to pay for compression software. Even after the trial period of WinRAR expires, 7Zip remains accessible. 7Zip uses its proprietary 7z archive format but can also handle a wide range of other archive formats. When you compress a file using 7Zip, it gets saved with a .7z extension.
How To Highly Compress Files Using 7Zip
Now, let's walk through the steps to highly compress files using 7Zip:
**Step 1:** Begin by downloading and installing 7Zip on your computer.
**Step 2:** Locate the file you wish to highly compress.
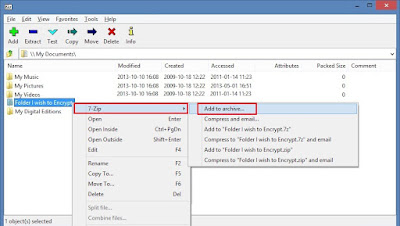
**Step 3:** Right-click on the file and select "7Zip" > "Add to archive."
**Step 4:** Choose the "Ultra" compression level for maximum compression.
Now, patiently wait for the compression process to complete. Once finished, you'll notice a significant reduction in file size, often reaching 90-95% less than the original file size.
Exploring WinRAR
What is WinRAR?
WinRAR is another well-known file archiver utility, but it follows a trialware model. It can both open and archive files in three formats: ZIP, RAR, and RAR 5. While similar to 7Zip in functionality, it operates under a different licensing structure.
How To Highly Compress Files Using WinRAR
To highly compress files using WinRAR, follow these steps:
**Step 1:** Before you begin, configure some settings in WinRAR by opening the application.
**Step 2:** Navigate to settings either through the "Options" menu or by holding down "Ctrl" + "S."
**Step 3:** In the settings window, go to the "Compressions" tab and click on "Create Default."
**Step 4:** Under "Set default compressions options," select the compression method as "best."
**Step 5:** In the archiving options, click on "Create Solid Archive."
**Step 6:** Proceed to the "Advanced" tab and click on "Compression."
**Step 7:** Set text compression to "Auto," and for memory usage, enter "128" MB. Click "OK" and exit.
Now, you can right-click on the file you want to highly compress, select "Add to archive," and then press "OK."
Conclusion:
Both 7Zip and WinRAR offer effective solutions for compressing files, each with its unique features. While 7Zip stands out for being completely free, WinRAR provides a trialware option with robust compression capabilities. By following the steps outlined in this guide, you can efficiently compress your files, saving valuable storage space and making it easier to manage and share your data. Whether you choose 7Zip or WinRAR, you'll have a powerful tool at your disposal for all your compression needs.


Comments
Post a Comment